
The Short Course which follows is a series of steps condensed from Nancy Howland's book, Doming Silver Beads, Step-By-Step Instructions for Making Your Own Silver Beads.
You can make sterling silver necklaces, bracelets, or earrings by following these step-by-step instructions for making silver beads. This project details the steps for making a 3/8" round 24-gauge silver bead from two 1/2" discs by using a dapping block and punches.
The bead is to (a) be silver, (b) have two holes, suitable for stringing, (c) be within 7.5 mm to 18 mm in diameter, (d) be formed from 24-gauge metal, and (e) be spherical (domed with a dapping punch and die block).
The flow chart below shows bead making from a metal sheet to the final polished bead.

Following the steps in this book, you will start with a ˝" silver disc, and finish with a 3/8" silver bead. As you make the 3/8" silver bead you can observe and experience the techniques and principles involved and then apply this information to any other size or shape bead. Even when the techniques are this standardized, your 3/8" beads will express your personality and be different from anyone else's work.
Some specific features are:
1. Size and Style of the Bead. Options are included in Chapters 2 and 11. Chapter 3 is based on using a ˝" disc to achieve a 3/8" spherical bead.
2. Bead Holes. When, where, what size, how to locate and how to drill bead holes are covered for conventional beads in Chapter 4 and for tilted beads in Chapter 9.
3. Designs or Textures. Chapter 5 includes information on any designs or surface textures you may wish to include and at what point in the process to include them.
4. How to Dome the Discs (Chapter 6). I use a punch smaller than the die size so that only the center of the disc is punched to the bottom of each die until the goal size is reached. Then the dome is rounded out with a full size punch.
5. Method of Soldering (Chapter 8). I use butt joint soldering and hold the domes in position by gravity and flux rather than by the use of binding wire or clamps. This method is extended to tilted beads in Chapter 9.
6. Refining and Polishing the Soldered Bead (Chapters 7 and 10). Included in these chapters are ways to hold the dome or bead, sanding techniques, and the use of various grits of sandpaper to refine the bead to a high polish.
7. Other Bead Sizes (Chapter 11). This manual uses the 3/8" (9.5 mm) bead as its model. This chapter gives information to expand your bead selection from 7.5 mm to 18 mm in diameter. Methods are provided for calculating the size of the disc needed to determine the size of the bead. Also included are the actual sizes of beads that I made from ten commonly available pre-cut disc sizes.
Appendix A is an Annotated Bibliography with information on resources that are directly related to bead making. Appendix B includes Plan Sheets for recording the steps when doming other size beads, so that your methods can be replicated. Appendix C lists tools, supplies and suppliers specific to bead making
What You Need:
· 24-gauge sterling silver for two discs (or copper or brass)
· Tools to cut discs: jeweler’s saw,
· circles punch, or pre-cut discs.
· Calipers
· 1.5” leather mallet, or equivalent
· Dapping punches and die block
· Round toothpicks
· Pencil torch and propane gas
· Medium solder
· Chunk of honeycomb block, flat
· soldering board and rotating pan
· Battern’s® Flux, or equivalent
· Fine-tipped tweezers
· Uncoated 22-gauge floral wire
· Flux dispenser bottle
· 22-gauge copper wire
· 320-grit, 400-grit & 600-grit silicon
· carbide sanding paper
· Polishing papers or pumice and
· rouge cloth
· Optional, buffing machine or rotary tumbler
Dapping Block Description
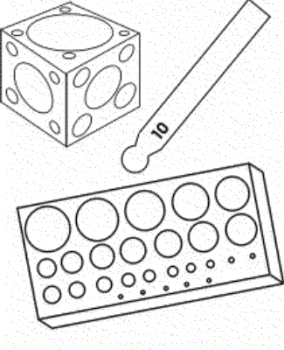
The dapping block is usually a cube or flat rectangular block of brass or steel in which various half-sphere impressions, called "dies", are cut. Dapping punches are cylindrical steel rods with a spherical bulb on one end. Half-sphere die impressions and spherical dapping punches range in size from 2 mm to 50.8 mm (2"). Die sizes are not marked on the block, but the diameter of the punch sphere is stamped in millimeters on the shank.
For this project, you need punch sizes 6, 7, 8, and 9 mm. A die size of 9.5 mm (3/8") in the dapping block is the final dome size, the target form for the silver bead. The final size of the bead must conform to the size of the final die so that you can shape two half-domes to exactly fit together.
Start with a 1/2" disc, needed to form the final 9.5 mm bead out of 24-gauge metal. The correct size disc is essential in order to form the desired size bead. If the disc is not large enough, the complete half-sphere cannot be reached without excessive thinning; if the disc is oversized, the disc can easily be damaged at the die rim as well as become stuck in the die well before the final size is attained.
1. Round Discs. Cut, punch or saw two 1/2" diameter discs of 24-gauge sterling silver. Remove any burrs.
2. Drill. Drill center holes in each disc using a #68 drill bit.
Even if you want a larger hole in the final bead, realize that during doming, the hole will stretch from 20-gauge to about18-gauge, or 1 millimeter. If the hole is drilled smaller than #68, doming will close the hole; if larger, the hole will over-stretch and warp out of shape.
3. Dome. Start with annealed discs. Throughout, only punch the disc center to the center bottom of the die until the last step where the dome is rounded-out. For best results use a 1.5" or larger face leather mallet to hammer the punches. Try to use one firm hammer stroke per die, until the last two steps where more strokes are needed.
Locate the 9.5 mm die as the final size for a 1/2" disc, and back up 4 larger sizes in sequence to start the first punch at die #1.
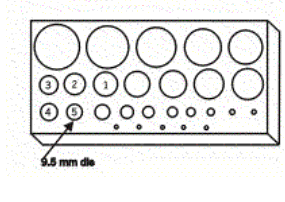
* At die #1 use a 9 mm dapping punch and hammer straight down on the bead hole to the die center bottom.
* Move to die #2 and, with the 9 mm dapping punch, hammer straight down the center.
* At die #3, change to a 7 mm dapping tool. This time, the partial dome likely sits slightly above the die rim. Hammer the punch straight down on the center bead hole. Stay centered on the disc and the die so that the disc edge will scrape past the die rim without creasing or cutting the metal.
* At die #4, your dome also will sit slightly above the die rim. Use the 7 mm dapping punch to hammer straight down centered over the bead hole and die. At this point, your dome should have reduced from 12.7 mm (the 1/2" you started with) to 10.3 mm in diameter, with a height of about 4.5 mm. The dome shape at this stage is a rounded cone.
* Anneal the two domes before the next doming step. After annealing, go to die #4 and use a 6 mm dapping tool to lightly hammer the punch down once on the bead hole to: slightly harden the metal (which prevents further stretching); and, to firmly establish the center point of the dome.
* Move the dome to die #5, the goal 9.5 mm die. Change back to the 7 mm dapping punch. At this stage, the dome sits high above the die rim.
When the angle of the dome wall to the die rim is at least 45 degrees, the dome will scrape past the die rim without being cut. If the dome is too shallow to the die rim (more than 10.3 mm in diameter), back up to the next larger die and use a 7 mm punch to hammer midway on the dome - north, south, east, west - to curl the dome wall inward.
* Use the 7 mm punch and start with a lighter hammer blow to partially move the center of the dome downward - then another hammer blow to about midway - then a third hammer blow to the base of the die. This three-step gradual hammering allows you adjust as you go to stay centered on the dome. Any off-center hammer blow will crease or cut the dome against the die rim.
| Hammer Cuts |
|---|
| Minor creases can be corrected by forcefully hammering a 6 mm punch inside of the dome on the crease line to press it out against the die. Any crease or cut marks should be hammered out, if at all possible. Run your fingernail across the crease. If your nail catches on the crease, the cut is unacceptably deep. A deep crease cannot be sanded out after soldering because deep sanding produces a lop-sided sphere and results in a very thin bead wall. |
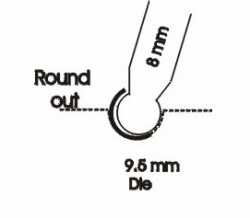
* Now that the dome center is seated inside die #5, change to an 8 mm dapping punch. Hammer straight down with considerable force. This hammer blow widens the base and arc of the dome, plus adds some height. If the hammer blow is too light, the dome likely will not attain enough height and will be stuck in the die. If it is stuck, use a 6 mm dapping punch to hammer half way down the dome sides and up to about 1 mm below the dome rim. The dome wall will curl inward and free the dome from the die block.
* Tilt the dome in die #5 so that the dome rim is as close as possible to the die center to prevent creasing the dome edges on the die rim. Use the 8 mm dapping punch to hammer all along the dome wall to round out the dome to a perfect half-sphere.
* Use calipers to measure the dome height. The height must be slightly higher than one half of the diameter, or at least 4.9 mm, so that there will be enough extra metal to allow the dome rims to be sanded flat.
| More Dome Height |
|---|
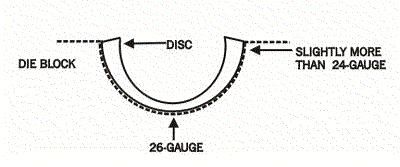
| As a result of the sinking/stretching process the dome’s wall thickness will be about 26-gauge at the base (bead hole) and slightly thicker than 24-gauge at the dome rim. If you need more dome height, return to die #5, tilt the dome in the die, and, use a 7 mm dapping punch to forcefully hammer midway to just below the dome rim to stretch the metal upward. (You may need to anneal first.) Repeat rounding out the dome with the 8 mm dapping tool. |
4. Sand. Place each dome on a sheet of 320-grit silicon carbide sanding paper. Poke a round toothpick in the bead hole to provide a "handle". Gently sand the dome in a circular motion, and rotate the dome a quarter turn after each circular motion to assure an even, flat surface that stays oriented perpendicular to the bead hole. Frequently measure the dome height until you have achieved exactly 4.75 mm (or one-half of the dome's diameter). Make sure the dome rim is rough sanded so that flux will cling to the rim ledge during soldering. At this point, re-drill the bead hole to a larger size, if desired.
5. Solder.
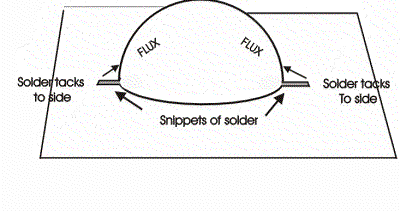
Tack-solder one of the two domes. On a flat soldering pad, place a clean, fluxed dome over two rectangular snippets of medium solder (e.g., 2 mm X 8 mm). Space the snippets of solder on opposite sides of the dome as indicated. With the torch, heat the dome just until the solder tacks up to the sides of the dome. Cool the dome, then swipe the dome rim ledge across the 320-grit sandpaper to remove solder from the ledge but still maintain the rough surface. When soldering the two domes together, you don't want the domes to "float" on melting solder and slide out of alignment. Instead, the solder on the sides of the dome follows the torch heat and moves through the joint by capillary action.
* Use a chunk of honeycomb soldering board placed on top of a flat soldering pad over pumice in a rotating annealing pan.
* Dip both cleaned domes in liquid flux and (bead hole side down) allow most of the flux to drain off. Use fine-tipped tweezers to pick up the domes. Thread 2" or so of uncoated 22-gauge straight steel floral wire, first through the tack-soldered dome, then through the other dome and poke the wire through a hole in the honeycomb block. The floral wire provides some support, but gravity holds the domes together. Gently tap the domes down and into perfect alignment over each other.
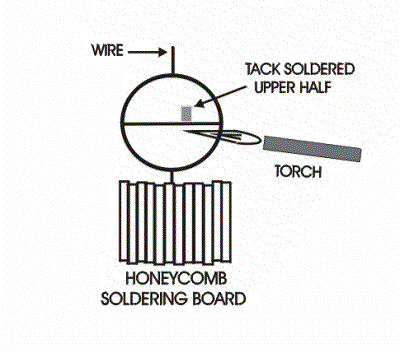
* Initially keep the torch at least 5" away; rotate the annealing pan and slowly warm the bead until the flux dries out and powders along the solder line. Direct the torch to the lower dome so that evaporating water escapes as air through the top bead hole before dried flux closes this hole. If this warming process is rushed, the flux will vigorously bubble up and push the domes out of alignment. (If this happens, remove the bead to pickle, rinse, flux and start again.)
* When the flux shows white powdering at the solder line, move the torch in quickly. Rotate the soldering board arrangement and direct the torch to a point just below the rim of the lower dome. The bead will heat up very quickly and solder "all at once".
* Air cool the soldered bead and remove the steel wire. Pickle and rinse in water. Use a flux dispenser bottle to insert water (or baking soda and water) into the bead to flush out acid. Drain on paper towels.
6. Sand and Polish.
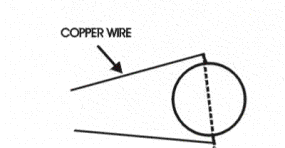
Thread a 4-6" length of 22-gauge copper wire through the bead and bend the wire ends back parallel to each other to provide a straight handle for hand sanding or machine polishing. This wire offers some way to grip the slippery bead and keeps the bead from rolling away. Leave the wires straight so that the bead will pull free from your fingers if the bead catches in the buffing wheel or other machinery.
* Use a 1" X 2" rectangle of 320-grit silicon carbide sanding paper to sand excess solder from the soldered joint, to remove lumps of solder left over from tack-soldering, and to remove any flaws on the bead surface. As you move in sequence from course to fine, always sand in the same direction.
* Further refine the surface with rectangular pieces of 400-grit, then 600-grit sanding paper.
* Depending on you equipment, three options for a final finish are:
Hand Finish. Use 400-grit, 600-grit, 1200-grit and 4000-grit polishing papers (WetorDry(r)Tri-M-lte(r) from Rio Grande), or rub the bead with wet pumice powder, to refine the surface to a scratch-free satin finish. Use a rouge polishing cloth for a final shine.
Machine Finish. Refine the surface with 400-grit 3M(tm) Radial Bristle Discs. Use a tripoli-charged buffing wheel, followed by a rouge-charged leather buffing wheel. Remove the compounds with diluted ammonia or use an ultrasonic cleaner.
Rotary Tumbler. Use green fine-cut plastic media in distilled water and deburring compound for 4 to 6 hours, followed by 4 hours of mixed stainless steel shot (minus the straight pins) in distilled water and burnishing compound.
Stop to admire your work and imagine the possibilities: add texture, mix metals, inlay, pierce or stamp designs on beads, solder wire twists on top of finished beads, add domes to other design projects. Using described techniques, you can make 5, 10 or 100 beads. But first, try a number of different dome sizes to see which sizes work the best for you with your tools.
For more options and details, see Doming Silver Beads, Step-By-Step Instructions
for Making Your Own Silver Beads, by Nancy Howland, 104 pp., $24.95 + $4.95 S&H,
ISBN: 0-9717360-0-6, Library of Congress Number: 2002104644. This book may be
ordered directly from Karin Eichhoff by check, money order or PayPal only.
Karin Eichhoff
1615 Cypress Trail
Midddleton, WI 53562
eichhoffk@yahoo.com
| Home | || | Gallery One - Necklaces | || | Gallery Two - Bracelets | || | Gallery Three - Earrings and Things | || | Book | || | About the Artist | || |
Web site by Lois Phillips.